Sail is a great and much more affordable alternative to traditional and managed WordPress hosting. It’s a free and open source CLI tool to provision and manage WordPress applications in the DigitalOcean cloud.

While the 1-click WordPress installer does the job for many DigitalOcean users, it’s very limited for power-users and developers. Sail CLI fills this gap, providing a complete set of tools to provision and manage a production-grade WordPress environment in just a couple of minutes, directly from the Terminal.
In this tutorial you will learn about Sail, you will install the CLI and use it to create your first Sail project. You will learn how to manage domains and SSL, create and restore backups, deploy and revert changes with Sail.
Prerequisites
You’ll need a DigitalOcean account and a read-write API access token. You will also need Python 3.6+, rsync and ssh installed on your system. If you’re using macOS or Linux, chances are these are already installed and available. Windows users should have these available via WSL.
A fully-qualified domain name is recommended, but optional, Sail generates a free subdomain which you can use for your site. Prior experience with any CLI-based tools (WP-CLI, git, composer, npm, etc.) is also recommended.
Step 1: Installing Sail CLI
The easiest way to download and install Sail CLI is via the official installer, which works for Linux, macOS and Windows (via WSL):
curl -sSLf https://sailed.io/install.sh | bashThis will download the latest version of Sail and install it on your system. You can use the same installer to upgrade an existing Sail installation, or downgrade if necessary. Sail can also be installed using various package managers, such as Homebrew and PyPI. You can learn about all installation and upgrade methods on this page.
After installing Sail, the new sail command should be available in any Terminal:
$ sail --version
0.10.4
Step 2: Configuring Your API Token
To use Sail with DigitalOcean, you will need a DigitalOcean account, as well as an API read-write token. This token will allow Sail to manage cloud resources on your behalf. Once you have this token ready, add it to Sail along with an admin e-mail address using:
$ sail config provider-token <token>
$ sail config email <your-email>
At this point the configuration is done and you’re ready to launch your first server.
Step 3: Creating Your First Sail Project
Create a new empty directory for your project, and within that directory run:
$ sail initThis command will create a new server on your DigitalOcean account, it will install and configure all the necessary software and services, it will assign a generated subdomain, obtain an SSL certificate, it will download and install the latest version of WordPress. Finally, it will download the application files from your DigitalOcean server, to your local directory.
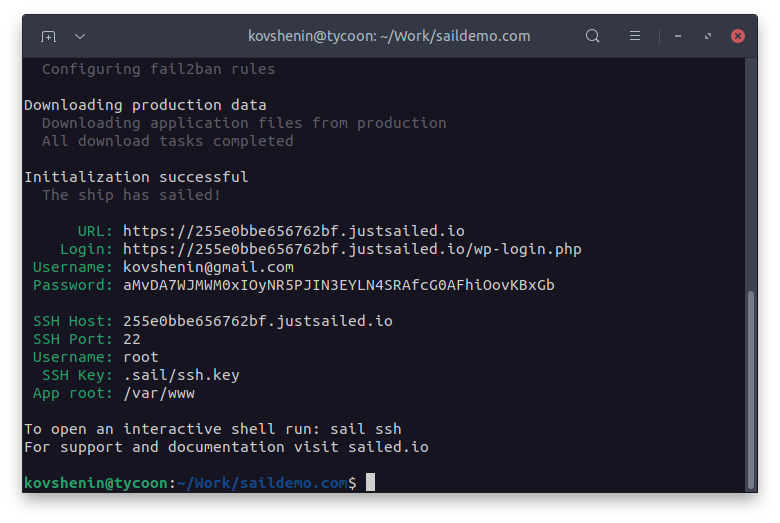
The init command may take a few minutes to complete, and at the end you will be greeted with the URL and access credentials of your new WordPress site. Note that for security purposes, Sail does not use a password to access your server, but instead uses an SSH key, which is located in the .sail folder inside your project directory.
Congrats! From this point onward, you can use the site pretty much however you like. Login, install themes, plugins, add content, etc. You will probably want to add your own domain first though, so let’s do that.
Step 4: Adding Domains and SSL Certificates
A fresh Sail project comes with a generated .justsailed.io subdomain which is useful for testing. However for production sites you will probably want your own custom domain, which you can add to your Sail project using:
$ sail domain add example.orgThis command will create a domain entry on your DigitalOcean account, and add the appropriate DNS records to point the domain to your WordPress site. The domain itself should be pointed to the DigitalOcean DNS servers to work (more on that here).
If you’d like to use a third-party DNS service, simply create an A or CNAME record to point the domain to your WordPress application, by IP address or hostname, both of which could be obtained by running sail info. This is useful if you’re looking to configure an additional CDN and/or reverse-proxy, such as Cloudflare.
After the domain has been pointed to your Sail server, you can request an SSL certificate using:
$ sail domain make-https example.orgThis command will request and install an SSL certificate from Let’s Encrypt. This certificate will be renewed automatically, as long as the domain remains pointed at your server. After that’s successful, it is recommended to update your primary domain in your WordPress application, using:
$ sail domain make-primary example.orgWhich will replace all occurrences of the generated subdomain with your new domain. You can learn more about working with domains in the knowledgebase.
Step 5: Creating and Restoring Backups
Backups are an essential part of any production website or application. Sail has a few handy commands to help you with that. To create a full site backup, run:
$ sail backupThis will download all application files, media and a full database snapshot from your production server to your local working copy, and store it in the .backups folder in your Sail project directory. If you would like restore the backup, run:
$ sail backup restore path/to/backup.tar.gzThere are also a few useful flags available: --skip-db to skip importing the database from the backup archive, and --skip-uploads to skip importing the media library files.
If you would like to export or import the database only, you can use:
$ sail db exportThis creates a new database snapshot and downloads it to the .backups directory. To restore a database from an export, run:
$ sail db import path/to/database.sql.gzNote that importing a database file will completely overwrite your production tables, including ones that are not present in the file being imported. If you’d rather perform a partial import without wiping the entire database, add the --partial flag to the import command.
The backups that you create with Sail will live on your local computer by default. For mission-critical applications, we recommend automatic backups, preferably stored on a different server. There are plenty of services which allow you to do that, including Sail’s own premium offering.
Step 6: Adding More Sites
Sail allows you to host as many sites as you wish on a single DigitalOcean server, provided there’s enough resources (disk space, memory, etc.) to support them all.
In Sail, each site is an application, and we use init to create new applications, which by default will spin up a new server. If you would like to create a new application on an existing server, you can use a namespace.
For example, if you have an existing Sail application in ~/projects/example.org, you can create a new application on the same server under the secondary namespace, like this:
$ mkdir ~/projects/secondary.org
$ cd ~/projects/secondary.org
$ sail init --namespace=secondary \
  --environment=~/projects/example.org
This command will skip provisioning a new server on DigitalOcean, and instead will use the same server where example.org is provisioned, and install the new application under the secondary namespace.
Note that most commands in Sail are scoped to the application, so for example creating a new backup in example.org will only back up that one application and its database. Domains and certificates are also per-application.
Step 7: Deploying with Sail
This step is not required, but highly recommended if you’re planning to do any kind of development on your WordPress project. The workflow described in this step will allow you to maintain a local development copy of your website, deploy changes to your production site when they’re ready, and roll them back quickly if things go south.
It is also worth noting that while using version control is highly encouraged (Git, Subversion, Mercurial), it is also completely optional.
Your working copy in Sail is a complete copy of your application files on your local computer. These files are pulled from your server initially when you provision your application. You can update your working copy manually at any time using:
$ sail downloadNote that if you have any undeployed local changes, they will be overwritten by the download routine. If you’re unsure, you can add the --dry-run flag, to see what exactly has been changed between your local working copy and production:
$ sail download --dry-runNote that even if you have not changed any application files in production explicitly (by installing a plugin for example), they may still be modified by core update routines, various plugin functionality, etc. And that’s okay. As long as you pull these changes from production to your working copy prior to your next deploy, you’ll be fine. It’s similar to having to pull changes from a version control repository, prior to pushing.
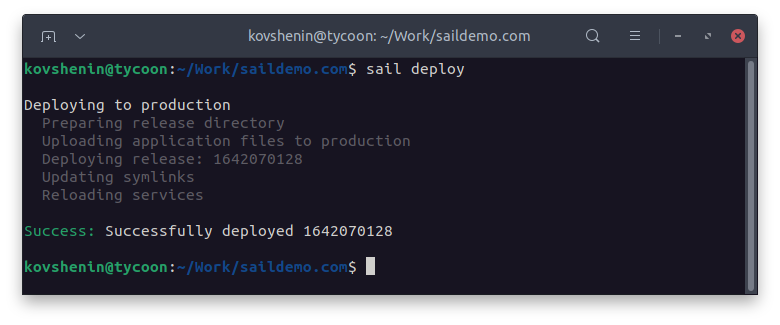
After you’ve made changes to your local working copy and ready to push them to your production site, use:
$ sail deployDuring a deploy, Sail does not overwrite your production files. Instead it creates a new directory with your most recent application files and changes the web root symlink to point to that directory.
This strategy allows deploys to be atomic, and also quickly reverted using:
$ sail rollbackWhich simply changes the web root symlink back to the previous release. Similar to downloading, you can view changes about to be deployed with the --dry-run flag. If you’d like to learn more about deployments with Sail, I recommend these three articles.
Further Reading
In this tutorial, I’ve covered some of the basic concepts behind installing and managing WordPress sites on DigitalOcean with Sail. If you’re looking for more advanced topics, here’s a short list of what you should explore next:
- Using the Local WordPress Development Environment with Sail
- How to Access Your WordPress Server via SSH and WP-CLI Using Sail
- Managing SSH Keys with Sail
- How to Manage System Cron Entries with Sail
- Working with Blueprints in Sail CLI
- An Introduction to the Sail Performance Profiler
- Push-to-Deploy with Sail and GitHub Actions
If you have any questions about Sail there’s a Slack community with a #help channel, where friendly people will help you out. If you’re looking to contribute to Sail or report a bug, check out the GitHub repository. If you’re looking to fully self-host your WordPress install, check out WP Shell.